![]()
Unity SDK Manual (V2)
Warning: Preview Release
Version 2 of the Unity SDK is currently in preview. The VR demos and Open-Face apps have not yet been updated, and further feature additions, API changes, and testing may be needed. Until V2 is fully released you should use V1 if stability and data integrity are critical.
There is a known issue with device connection when building for Windows when using the V2 package in Unity 2020.3.
Version 2 Upgrade Guide
- In general all references containing "EmteqVR" have been renamed to "Emteq", the most commonly found change will be "EmteqManager" replacing old "EmteqVRManager" references.
- Note that this also includes the "EMTEQVR_EYE" flag symbol, which must be changed to "EMTEQ_EYE"
Getting Started
Get started with the emteqVR Unity SDK Package in Unity. Follow these steps to install the package and try out the example demos included. This quickstart guide helps you set up the emteqVR Unity SDK Package for the first time, within your Unity project.
Requirements
- An installed copy of the Unity Editor. To install Unity for personal use via Unity Hub, or Unity+ for professional use, see Download Unity.
- A Unity Project created with Unity Editor version 2019.4 or higher - this can be any of the following:
- A brand-new project. For more information, see Unity Quick Start Guide.
- A guided tutorial project. For more information, see Getting Started with Unity.
- An existing project.
emteqPRO Mask Experience
The emteq mask experience is comprised of three parts. The emteqVR Unity SDK, the Device Link Services with Expression Engine and, the emteqPRO mask firmware:

The emteqVR Unity SDK will be contained within your Unity application. It will be responsible for communicating, through the API, with the Device Link Services. The Device Link Services, in turn, is responsible for communication with emteq Cloud Services and the emteqPRO Mask firmware.
Installing the SDK
This is the stable EmteqVR SDK for Unity. It provides APIs to access biometric data from emteqPRO Mask sensors as well as demos with examples of API usage.
Installation
Through the Package Manager found under ‘Window > Package Manager' within the Unity Editor.
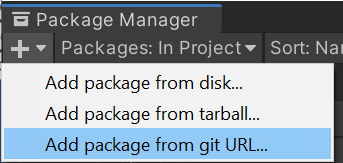
Open the package manager, click the + icon, and add git url.
https://github.com/emteqlabs/emteqvr-unity.git
Samples
Once the package has been imported, you must also import the EmteqVR Sample scenes to access the demos and the EmteqVRManager prefab.
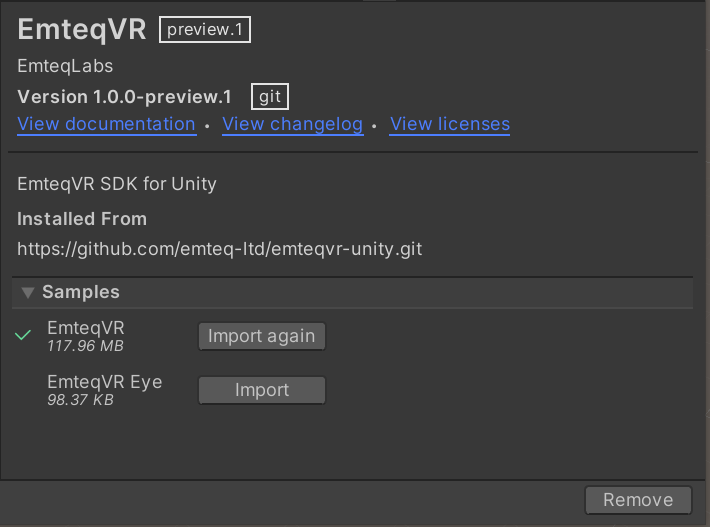
The sample demos provided are intended to be a reference when setting up your own project and are not to be used to setup your own VR experience within an app. The Usage Section will guide you through how to integrate the EmteqVR SDK with your VR experience.
Project Setup
Some additional project configuration is needed to support the SDK:
Common
- Change colour space to linear
- Set "Active Input Handling" to "Both"
- Import TMP essentials (this can be initiated automatically by opening one of our sample scenes)
Windows
- Set "Scripting Backend" to "Mono"
- Set "Api Compatibility Level" to ".NET Framework"
Pico Neo3
- It is reccomended that you begin testing using "OpenGLES3"
- Disable "Auto Graphics API"
- Remove "Vulkan" from the list
- Set "Minimum API Level" to at least 21
- Set "Scripting Backend" to "IL2CPP"
- Set "Api Compatibility Level" to ".NET Framework"
- Set "Target Architectures" to "ARM64" only
- Set "Internet Access" to "Require"
Usage
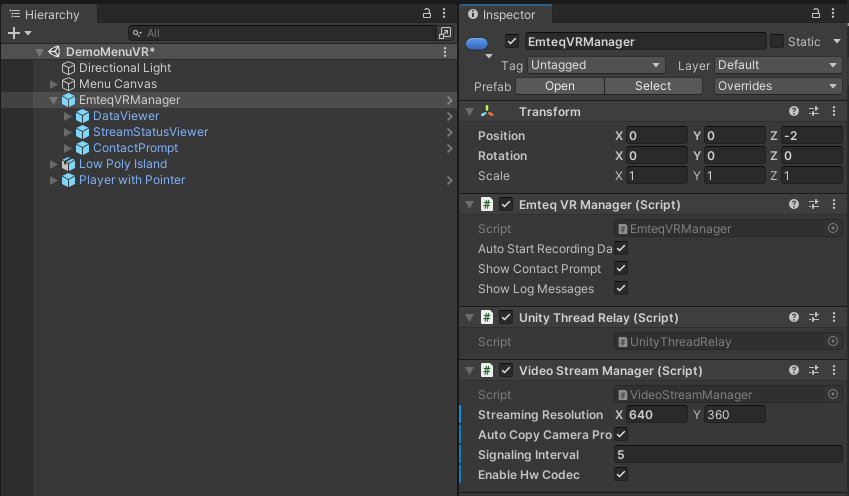
Once you've installed the SDK package via UPM and imported the EmteqVR Sample, simply drag the EmteqVRManager in to your main Unity scene. The prefab is located under Assets\Samples\EmteqVR\<sdk version>\EmteqVR\EmteqVRManager.prefab
EmteqVRManager
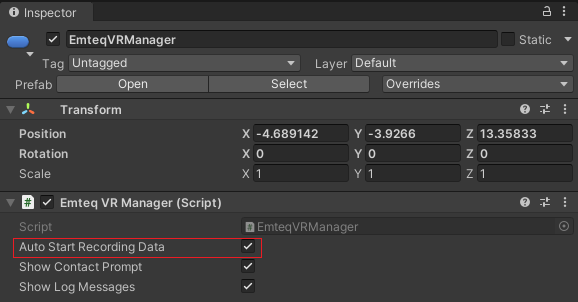
The EmteqVRManager is set to DontDestroyOnLoad. It comes with a couple of default options that you can turn off:
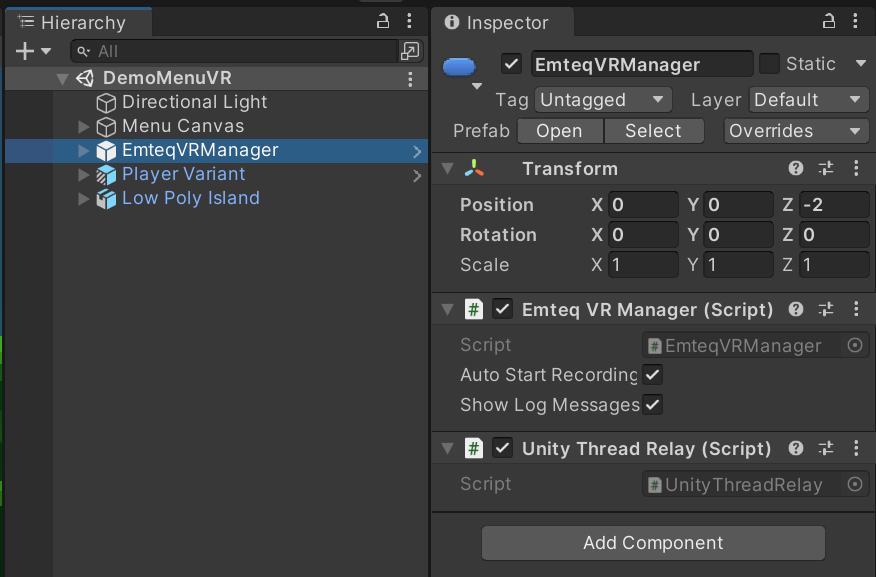
Auto Start Recording Data: by default, we will start automatically recording data when the application starts.
Show Log Messages: to see EmteqVR log messages on the Unity Console. Note, the logging of messages is stripped out when you compile a Release Build in Unity.
Data Viewer
At the top right corner of your Game view you will notice our data viewer.
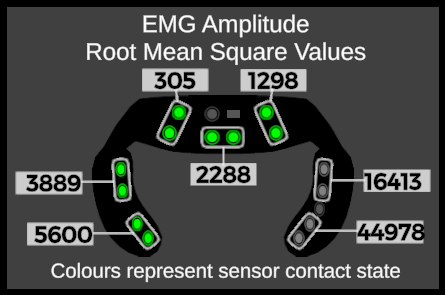
This is a development panel that can be removed on release builds if you wish. It will not render in VR but you will see it on your monitor screen. It allows you to see EMG Amplitude data flowing from the EmteqVR mask as long as it is connected, and it will also display a traffic light system to show the contact state of each pair of sensors.
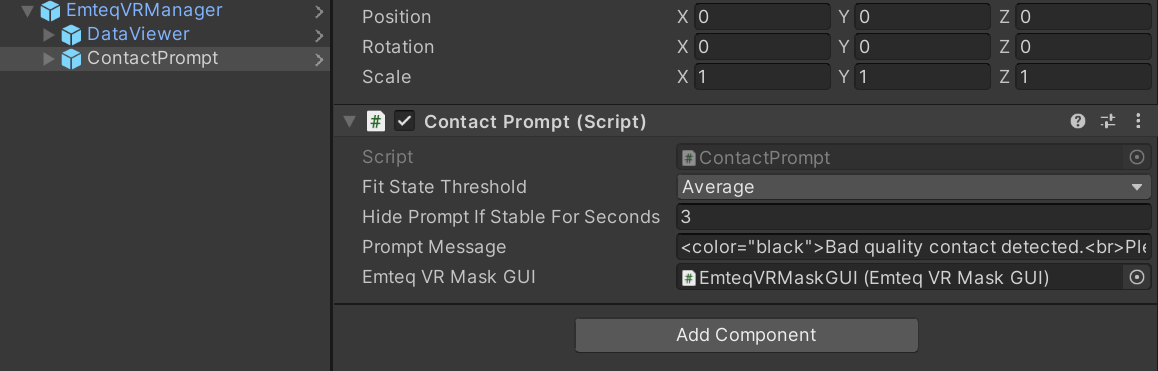
Contact Prompt
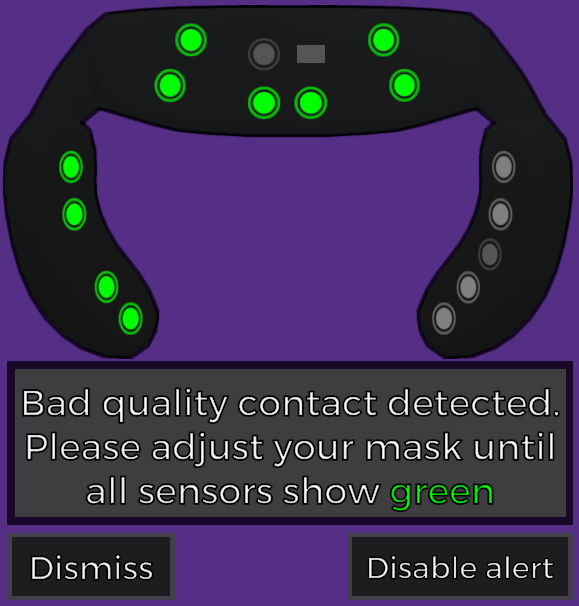
This will prompt VR users when the mask is not properly fitted on their face and sensor contact quality is bad. This can usually be easily fixed by adjusting the headset straps to be a little tighter, removing hair that might be over any sensors. Swiping the sensors with a moist cloth will normally give very good quality contact.
The contact prompt will pop out every time the mask is removed from the face and contact quality is always recorded along with sensor data to be used for data analysis.
Showing the contact prompt with high sensitivity may be disruptive to your user experience. You can choose to lower fitstate threshold required, but bear in mind that this will affect the quality of the data collected.
You may choose deactivate this by toggling off the Contact Prompt gameObject under EmteqVRManager. The contact state may still be monitored through the SuperVision app.
The options in the Inspector also allow you to adjust how many seconds it takes for the contact prompt to disappear after stable contact is established.
You may also edit the message displayed to your users.
Data Points & Data Sections
Data points and data sections allow us to capture extra information about the state of an app at any given time. The APIs look like this:
public void SetDataPoint(string label, object metadata = null);
public void StartDataSection(string label, object metadata = null);
public void EndDataSection(string label, object metadata = null);
A Data Point can be considered a labelled event that happens during a session.
A Data Section is a labelled period of time that happens during a session.
The metadata is an optional parameter to allow the developers to save extra information along with the event marker.
Internally, this method uses the Unity serializer; therefore the object we pass in must be supported by the serializer: it must be a MonoBehaviour, ScriptableObject, or plain class/struct with the [Serializable] attribute applied.
Example:
[Serializable]
struct CubeData
{
  public Vector3 Position;
  public Quaternion Rotation;
  public Color Colour;

  public CubeData(Vector3 position, Quaternion rotation, Color color)
  {
  	Position = position;
  	Rotation = rotation;
  	Colour = color;
  }
}
Can be used like this:
public void OnButtonClick()
{
  var metadata = new CubeData(_cube.transform.position,_cube.transform.rotation, Color.magenta);
  EmteqVRManager.SetDataPoint("cube data", metadata);
}
And will produce the following Json:
{
  "Label": "cube data",
  "Type": 0,
  "Timestamp": 671891856843,
  "Metadata": {
  	"Position": {
  		"x": 0.0,
  		"y": 1.2300000190734864,
  		"z": 4.949999809265137
  	},
  	"Rotation": {
  		"x": -0.3860136568546295,
  		"y": -0.4094741642475128,
  		"z": 0.3879454433917999,
  		"w": -0.729947030544281
  	},
  	"Colour": {
  		"r": 1.0,
  		"g": 0.0,
  		"b": 1.0,
  		"a": 1.0
  	}
  }
}
The first attribute is the data point label, the second is the type (point, start or end), the third is the timestamp which can be used to correlate with the biometric data collected from our sensors.
This can be used to produce line charts such as this:

We can also use the start/end markers from the second attribute to generate timeline style graphs, such as the one below. Combined with the line graph showing our biometric data this can give useful insights regarding the state of the application at any given time.

An example of usage for timeline graphs is the affective videos we use for data collection. Rather than marking the beginning and end of video with two data points like "bull fighting starts" and "bull fighting ends," we would simply call the API below:
private void OnShowSubtitle(string subtitle)
{
  EmteqVRManager.StartDataSection(subtitle);
}

//and then later
private void OnHideSubtitle(string subtitle)
{
  EmteqVRManager.EndDataSection(subtitle);
}
This will produce the following Json:
{
  "Label": "bull fighting",
  "Type": 1,
  "Timestamp": 671891855747,
  "Metadata": {}
}
followed by
{
  "Label": "bull fighting",
  "Type": 2,
  "Timestamp": 671891858146,
  "Metadata": {}
}
The start and end of a data section are marked by the Type attribute (1 and 2 respectively). Notice that the metadata field is empty as the optional second parameter in StartDataSection was not used.
The DataSection label must match in order to create a data section similar to the timeline items shown on the previous example chart.
We can create overlapping data sections, as long they have different labels. However if we call StartDataSection with a label matching that of an open section (without calling EndDataSection first), we will automatically close the previous data section and open a new one.
Any data section that doesn’t have an end node will be automatically closed at the end of a session.
Recording Data
By default, the Unity SDK will record data automatically when the scene starts and a connection is successfully established with the mask.
Data will be saved in the following location:
C:\Users\[CurrentUser]\Documents\EmteqLabs\[ApplicationName]\Upload
- [CurrentUser] is replaced with the current Windows username
- [ApplicationName] is replaced with the application hosting the SDK
Files are named using the current date and time, for example:
2021-05-26T10-51-45.dab2021-05-26T10-51-45.json
Manually Triggering Data Recordings
Currently, when manually starting a new data recording a there will be a delay of ~5 seconds before any new data is communicated from the mask. Please bear this in mind when developing your experiences with manual data recording.
If you wish to have more control over when data is saved, the API exposes a method to do so. In the EmteqVRManager Prefab, the option to "Auto Start Recording Data" needs to be disabled.
Once automatic data recording has been disabled, manual data recording can be controlled via the following APIs:
StartRecordingData();
StopRecordingData();
StartRecordingData()
If data is not currently being recorded, calling StartRecordingData() will start a new data recording. This will create a .dab file that will be populated with data from the mask.
Data will be continuously added to the file until either StopRecordingData() is called, or the Unity application is closed.
In addition to the .dab file, a .json file is also generated which stores the events and DataPoints that occur during the experience.
StopRecordingData()
If data is being recorded, calling StopRecordingData() will stop saving data to the current .dab and .json files.
Any open data sections in the .json file will be closed, preserving the order in which they were opened.
Demo Scenes
The following is a summary of the Demo Scenes available in the Unity SDK.
All scenes contain certain standard UI elements, such as a [Back] button to return to the main menu and a GUI showing active sensor values for the mask in real-time. In the case of the VR app this sensor information is shown only on the monitor screen and not with the VR app so as not to distract the user running the demo in VR.
Heart Rate
The Heart Rate scene is among the simplest. It shows the currently measured Heart Rate on the left along with messaging explaining more detail about Heart Rate data collection, namely that the user must allow 20 seconds of good contact to calculate the average value to display.
On the right a button to calculate the baseline, along with instructions on usage. This can be used to calculate the Standard Deviation and Median Heart Rate over a custom period of time.
These actions will be written into the Event file showing the start/stop times for the calculation.
Calibration
The Calibration section is only available in the Desktop or Open-face version of the app, in the VR version of the app you can access a ‘Calibration' scene from ‘Affective Videos'.
The scene contains several UI elements. Instructions for what facial expression should be pulled along with a [Record] button to begin each section of the calibration.
A face which shows the expression currently expected to make it as clear as possible to the user what is expected of them.
Finally along the bottom a breadcrumb trail showing what expressions are coming up and what has been completed thus far.
The calibration data will be available in the Event file which will denote the timestamps when specific calibration events occurred.
Data Points
This scene has less to do with gathering sensor metrics and more to do with demonstrating how to structure event markers as well as the ability to split data recording via triggers within the Unity app.
More specific information about data recording can be found above.
Affective Videos
Much like the Calibration section detailed above this contains a full calibration section with event markers, but is followed up with two distinct videos chosen to evoke contrasting emotional responses. These of course have corresponding event markers.
When run in VR this will place the user in a cinema, where they can view the calibration and videos on a screen.
Eye Tracking
To access the eye tracking integration, the first thing you need to do is, download the Vive SRAnipal SDK and import the .unitypackage into your Unity project. Help with this can be obtained from Tobii's official Unity Setup Guide.
Once this is all set-up and running, to access the EmteqVR eye tracking integration and demo, you must also import the EmteqVR Eye Sample scene via Unity Package Manager.
![]()
Once you've installed the SDK package via the Unity Package Manager and imported the EmteqVR Eye Sample, you will need to open the Unity player settings and add EMTEQ_EYE as a pre-processor directive under Script Compilation > Scripting Define Symbols.
![]()
Once this is done, simply open the EyeTrackingDemo scene. The scene is located under Assets\Samples\EmteqVR Eye\Demo.
Eye Tracking Demo
![]()
The Unity SDK package includes an example scene intended to demonstrate how Tobii Eye Tracking can be used alongside the emteq mask. The EyeTrackingDemo scene contains a working example of how this should be implemented in your application. For this demo to function as intended, Tobii Eye Tracking must already be setup in your project and a SteamVR camera must be added to the scene.
EmteqVR_EyeManager prefab
The EmteqVR_EyeManager is a prefab that will be contained under Assets\Samples\EmteqVR\<sdk version>\EmteqVR Eye\EmteqVRManager.prefab. This prefab must be present in any scene, in which you wish to use Eye Tracking with emteqVR Unity SDK. The prefab gives access to the EyeTrackingManager class, which is fundamental to capturing Eye Tracking data.
TrackedObject.cs component
TrackedObject.cs is a script that must be attached to any object in the scene, from which you wish to obtain Eye Tracking data. Once the user begins looking at any tracked object, a EmteqVRManager.StartDataSection call is made, which passes the tracked object's unique identifier. Similarly once the user ceases looking at any object a EmteqVRManager.EndDataSection call is made.
When using the provided EyeTrackingManager.cs script the objects to be tracked should be on the “Default” layer.
File Formats
| File | Description |
|---|---|
.dab | Contains the data from the mask in binary format. This can be converted to CSV using the Dab2Csv tool. |
.json | Contains all the events and DataPoints that occur during the experience. These are timestamped so that they can be correlated with data from the mask. |
Consuming Data
Depending on the way that the data is exposed, data from the SDK can be consume by either calling methods or subscribing to events. All of these can be accessed throught the EmteqVRManager prefab.
Events
OnDeviceFitStateChange
The system is able to detect how well the mask is fitting to the user's face and is exposed using a FitState enum. When a change in FitState is detected, the OnDeviceFitStateChange event is fired.
You can subscribe to this event if you wish to know when a change in FitState has occurred. A definition of the FitState enum is as follows:
The SDK uses the OnDeviceFitStateChange internally to display the Contact Prompt when the FitState falls to a below average level.
public enum FitState : sbyte
{
  Failure = -1 ///< Fit detection failure e.g. No-Face-Plate or Sensor failure
  , None = 0 ///< Not on-face
  , Measuring = 1 ///< No-Score - Fit is being determined
  , Failing0 = 2 ///< Minimal to detect face i.e. 3 pairs any contact
  , Failing1 = 3 ///< Minimal to detect face i.e. 4 pairs any contact
  , Failing2 = 4 ///< Minimal to detect face i.e. 5 pairs any contact
  , Failing4 = 5 ///< Minimal to detect face i.e. 6 pairs any contact
  , BelowAverage0 = 6 ///< Basic function     i.e. 3 pairs full contact + 4 pairs any contact
  , BelowAverage1 = 7 ///< Basic function     i.e. 3 pairs settled contact + 4 pairs full contact
  , Average = 8 ///< General function    i.e. 5 pairs settled contact + 2 pairs full contact
  , VeryGood = 9 ///< Good on all sensors  i.e. 7 pairs settled contact
  , Excellent = 10 ///< Optimal on all sensors i.e. 7 pairs settled contact + Excellent impedance
  , Perfect = 11 ///< Ideal sensor Impedance... possible on face?...likely not, but acts as a manufacturing test condition within sensor testing procedure or an 'achievement' to unlock for users!
}
OnSensorContactStateChange
Further to the FitState, individual contact states of the contact pairs are exposed through the SDK. Using the values returned by OnSensorContactStateChange, you are able to understand the ContactState of those pairs.
Subscribing to the OnSensorContactStateChange delegate a Dictionary<MuscleMapping, ContactState> is returned which allows you to map a particular contact pair (MuscleMapping) to it's contact state (ContactState).
A definition of the MuscleMapping enum is as follows:
public enum MuscleMapping : byte
{
  LeftZygomaticus = 0,
  RightZygomaticus = 1,
  LeftOrbicularis = 2,
  RightOrbicularis = 3,
  LeftFrontalis = 4,
  RightFrontalis = 5,
  CenterCorrugator = 6
}
A definition of the ContactState enum is as follows:
public enum ContactState : byte
{
  /// @{ Off-to-On
  Off      = (NegativeContact.Off) | (PositiveContact.Off) ///< Both are lifted
  , Off_On    = (NegativeContact.Off) | (PositiveContact.On) ///< First is lifted, Second is in-contact
  , On_Off    = (NegativeContact.On) | (PositiveContact.Off) ///< First is in-contact, Second is lifted
  , On      = (NegativeContact.On) | (PositiveContact.On) ///< Both are in-contact
  /// @}

  /// @{ Stable - Half-Contact
  /// @remark Stable_Off may occur when one lead has intermittent contact
  , Off_Stable  = Off_On | (PositiveContact.Stable) ///< Both are in-contact
  , Stable_Off  = On_Off | (NegativeContact.Stable) ///< Both are in-contact
  /// @}

  /// @{ On-to-Stable - Good contact
  /// @remark Stable_On may occur when one lead hmade good contact shortly before/after the other (after one lifted for a moment etc)
  , On_Stable   = On | 0            | (PositiveContact.Stable) ///< Both are in-contact
  , Stable_On   = On | (NegativeContact.Stable) | 0                ///< Both are in-contact
  , Stable    = On | (NegativeContact.Stable) | (PositiveContact.Stable) ///< Not likely to change; firmly established.
  /// @}

  /// @{ Settled
  /// @remark Indictaes filtered data for this contact is good for use
  /// @note Bipolar Settled is not mutually exclusive and both leads are always settled together
  , Settled    = Stable | (NegativeContact.Settled) | (PositiveContact.Settled) ///< Saturated signal filters - Signal useful
  /// @}

  /// @{ Fault - Half-Contact
  /// @remark Fault may occur when one lead has stable contact while the other is always Off
  , Fault_Stable = Off_Stable | (NegativeContact.Fault) | 0                ///< Both are in-contact
  , Stable_Fault = Stable_Off | 0            | (PositiveContact.Fault) ///< Both are in-contact
  /// @}

  /// @{ Fault
  /// @remark Required to be externally determined i.e. Off_Off reported for total fault wihtout test logic
  /// @note Bipolar Settled is not mutually exclusive and both leads are faulted if no half-contact exists
  , Fault     = Off | (NegativeContact.Fault) | (PositiveContact.Fault)
  /// @}
};
OnHeartRateAverageUpdate
To consume the average heart rate data, the OnHeartRateAverageUpdate delegate is available to subscribe to.
The average heart rate is measured in Beats Per Minute (BPM) and the delegate is fired once every second. The data type is a double.
After correctly fitting the mask, it can take up to 20 seconds for the average heart rate to be calculated due to the need to gather sufficient data.
Methods
Some data from the mask is received at a relatively fast rate (up to 2KHz). Having these as events to subscribe to would be inefficient and unnecessary in most cases. Instead, these types of data are exposed through methods which retrieve the latest value at the time the method is called. This allows developers to choose the frequency at which these methods are called, depending on their needs.
GetRawPpgSignal()
To consume raw Photoplethysmographic (PPG) data, this is obtained using the GetRawPpgSignal() method.
A PpgRawSignal struct is returned and has the following definition:
public struct PpgRawSignal
{
  public UInt16 Ppg;
  public UInt16 Proximity;
}
GetEmgAmplitudeRms()
Returns a Dictionary<MuscleMapping, ushort> which allows you to map a particular contact pair (MuscleMapping) to it's current amplitude of the muscle EMG in-band signal.
A definition of the MuscleMapping enum is as follows:
public enum MuscleMapping : byte
{
  LeftZygomaticus = 0,
  RightZygomaticus = 1,
  LeftOrbicularis = 2,
  RightOrbicularis = 3,
  LeftFrontalis = 4,
  RightFrontalis = 5,
  CenterCorrugator = 6
}
IsDeviceConnected()
Returns a bool to indicate whether or not the emteqPRO device has been successfully to from the SDK.
SetParticipantID(string id)
Allows an ID to be set against the data that's being recorded. This can be used to later identify a particular user with a data recording.
The Participant ID is added to the .json events file and will appear in the following format:
{
  "ParticipantData": {
    "ParticipantID": "12345",
    "StudyName": "ApplicationName"
  }
}
Streaming the Camera view
Streaming Setup
In most cases no additional setup will be required beyond updating the Emteq SDK. The VideoStreamManager will wait for a message from the Supervision app containing connection details, it will then automatically find the main camera in the scene, and set up the streaming components to mirror its view.
If you wish to change the main camera during runtime without destroying the previous one, then you must call the public function MainCameraChanged. This will set a flag that will cause the system to search for the new main camera.
WebRTC and Render Streaming
The video streaming support is built upon two Unity packages, WebRTC for the base protocol, and Render Streaming for the video streaming over WebRTC.
- https://docs.unity3d.com/Packages/com.unity.renderstreaming@3.1/manual/index.html
- https://docs.unity3d.com/Packages/com.unity.webrtc@2.4/manual/index.html
Controls and configuration
Resolution
Simply set the desired resolution for the streaming here.
Streaming size should match display aspect ratio. It must be set prior to initialisation.
Auto Copy Camera Properties
By default the streaming system copies all properties from the existing main camera to align their rendering settings, if this causes problems or you wish to manage the properties manually then you can disable the behaviour with this flag.
Signalling Interval
This control relates to the signalling behaviour within the WebRTC system, it should not need to be changed, but is available if you would like to tweak the time interval for polling from signalling server.
Hardware Encoder
You can enable or disable hardware encoder. This is supported on the Pico, however on Windows an NVIDIA graphics card is required. See the NVIDIA site for information on graphics cards that support NVCodec.
StreamingStates State
This allows you to read the current state of the stream to see if it is disabled, initialising, or currently streaming.
StreamStatusWidgetVisible is a public flag that can be accessed during runtime within the VideoStreamManager, it toggles visibility for the streaming status widget that will show in the top left corner of the view.
Usage notes
The streamer will incur a performance cost while active, how much will depend on the specifics of your project and the resolution of the stream. The system has been designed to completely remove all streaming components when not in use, this means that you can restore full performance just by disconnecting the stream via the SuperVision app.
