Pico Neo 3 Pro
Importance of safety
Do not use the equipment before reading, understanding and assimilating all information about safety.
Package Contents
The emteqPRO Mask (installed into the Pico Neo 3 Pro Eye) is supplied with two sets of side inserts. The inserts should be swapped to fit different face shapes and sizes as appropriate.
System Requirements
There are no specific requirements for running the emteqPRO and the Pico Neo 3 Pro Eye given the system is integrated. However to run the SuperVision app, which provides real-time monitoring and control over the participants then you will need a Windows 10 powered PC or Laptop with a discrete GPU.
When running on a laptop with a discrete GPU you need to ensure you are running the apps on the GPU, which is usually accomplished by running Windows ‘High Performance Power Plan'. Nvidia Optimus (or AMD ‘Dynamic Switchable Graphics').
Getting started with your emteqPRO Mask
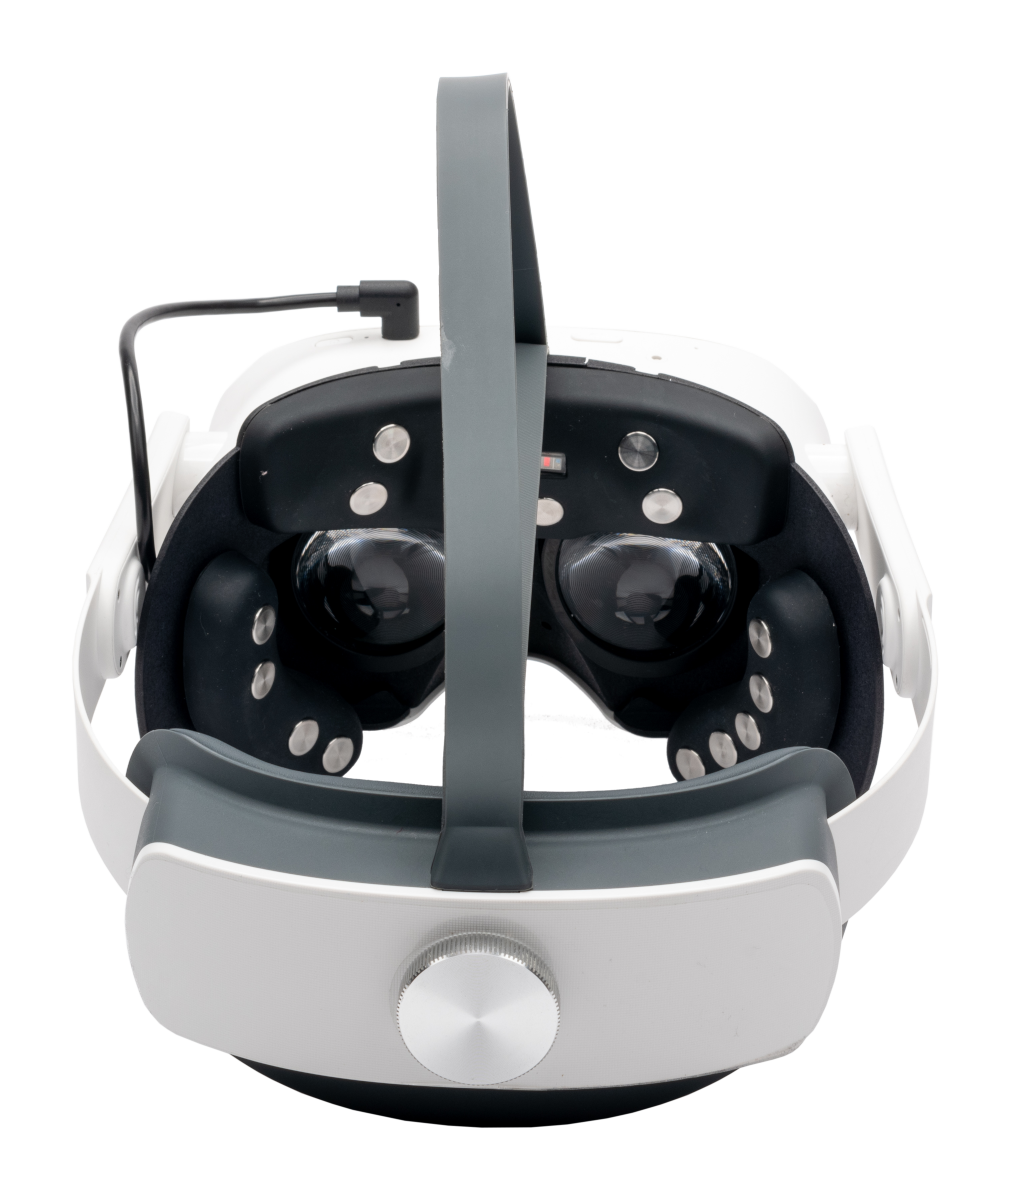
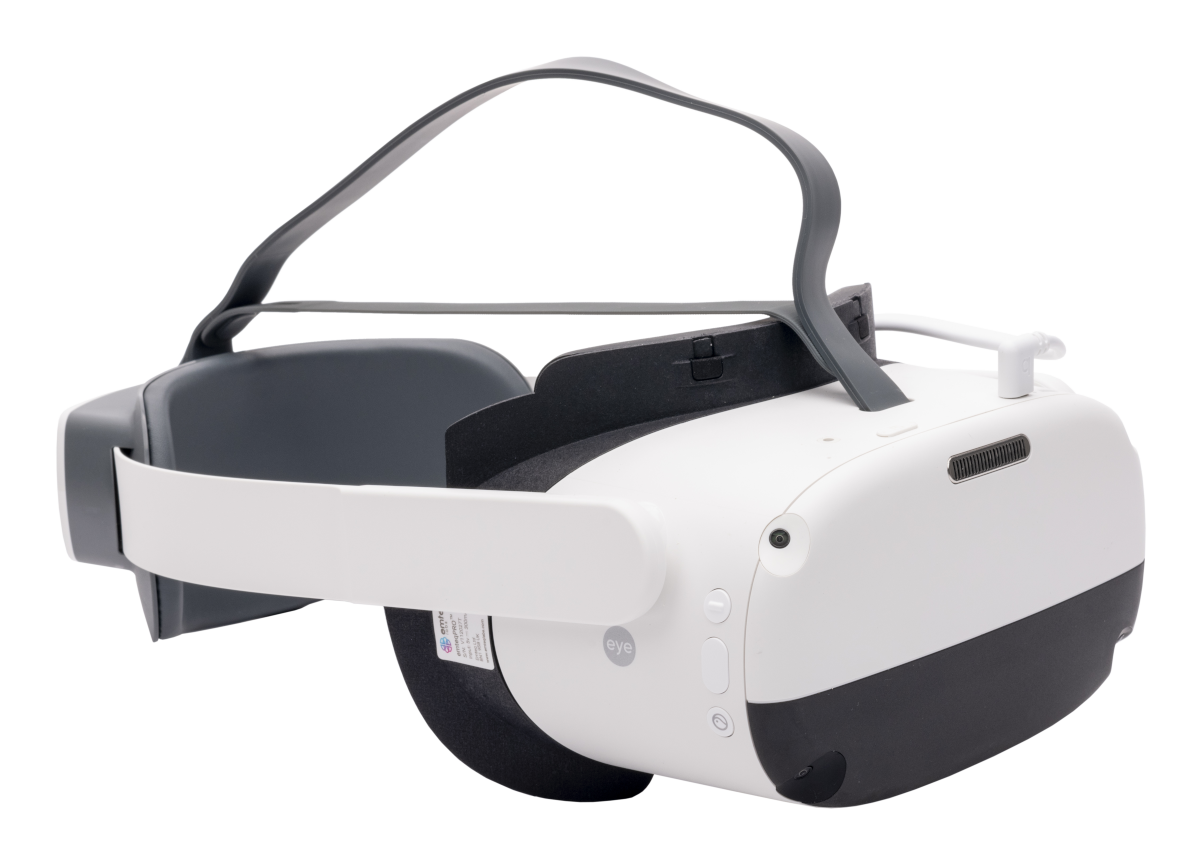
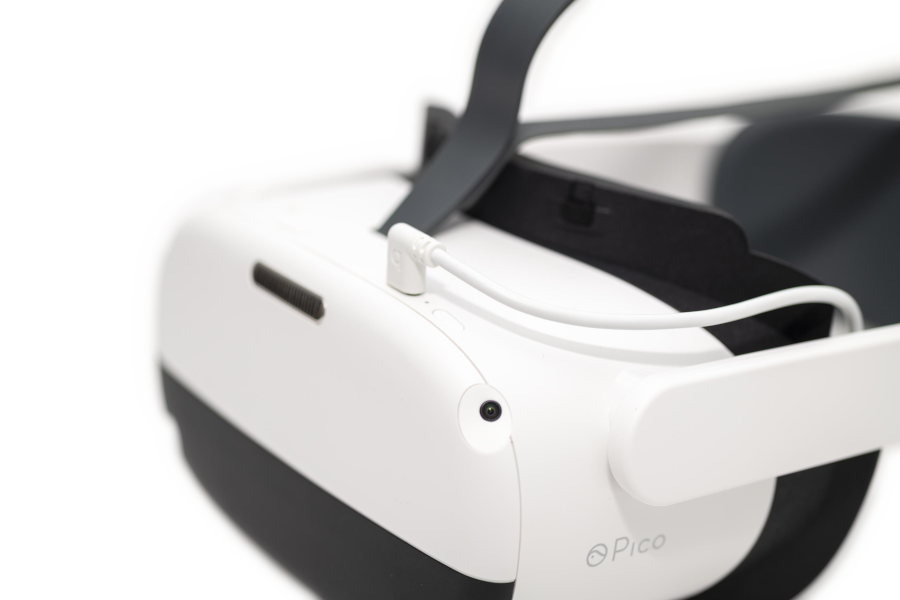
Upon receiving the emteqPRO device it will be pre-installed into a Pico Neo 3 Pro Eye, please check if the device insert has been adjusted on the HMD and connected via the USB cable as shown in the following images.
Do not expose the optical lenses to direct sunlight or other strong light sources. Exposure to direct sunlight may cause permanent yellow spot damage on the screen. Screen damage caused by sunlight exposure or other strong sources of light is not covered by the warranty.
-
To connect to the emteqPRO mask and beging recording data you will need an app that contains the Emteq SDK. This comes in pre-baked form available on our downloads page or is available as a Unity Plugin package that allows you to integrate our API with your own VR experiences. Please find more information in the section Emteq SDK Guide.
-
To monitor the real-time signals from the device you will need to install and open the SuperVision application on your PC. To connect the emteqPRO Mask to SuperVision, you will need to run the Emteq SDK, we recommend one of our demo scenes (‘EmteqVR_Demo.exe') for begineers to become aquainted, or use your own Unity scene containing our SDK if you wish. Please follow our step-by step instructions in section Using the emteqPRO software. For more information on the SuperVision app see section The SuperVision App.
-
Raw and filtered sensor data saved from the device will have the extension
.dab. Event-related data will be saved in.jsonformat (when using the emteqSDK). To convert the.dabfiles to.csvformat please use the data insights upload facility within SuperVision. For more information on the data see section, Data Overview. -
To help you get start with analysing the data you collected using the emteqPRO system, we provide some sample analysis scripts for Python. For more information see Section Sensor data and analysis.
Please see the Downloads section for all software.
Getting the Pico Neo 3 Pro IP Address
In order to monitor your data in real-time via SuperVision you will need to obtain the IP address of the Pico Neo 3 Pro prior to starting the experience.
- Firstly from the Home screen select ‘Settings'.

- Ensure you are connected to the appropriate WiFi.
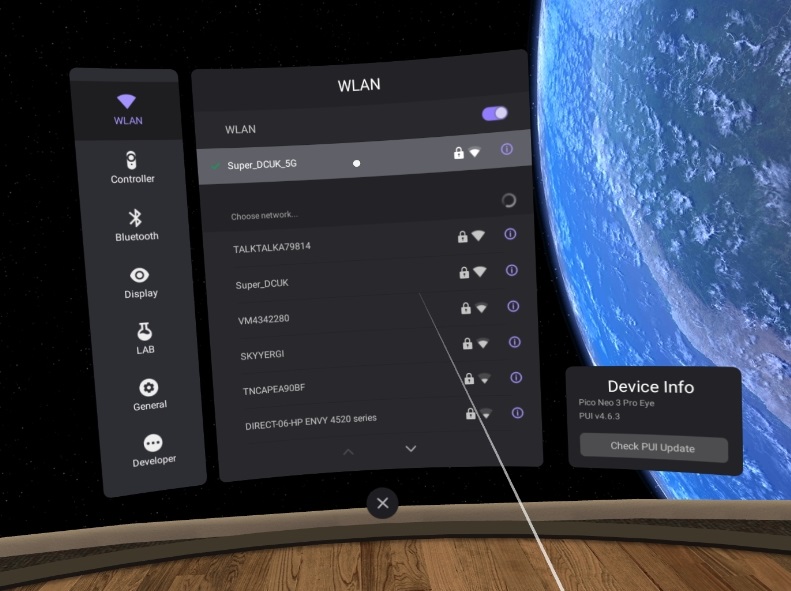
- Scroll to the bottom and select ‘Advanced Options'.

- Select the WiFi connection you are using, usually at the top.
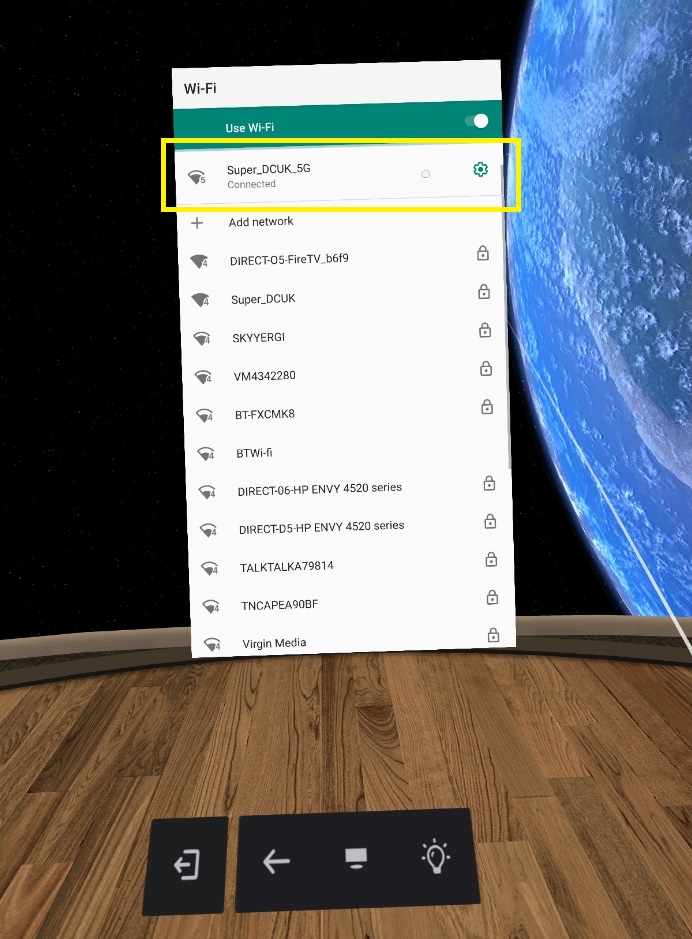
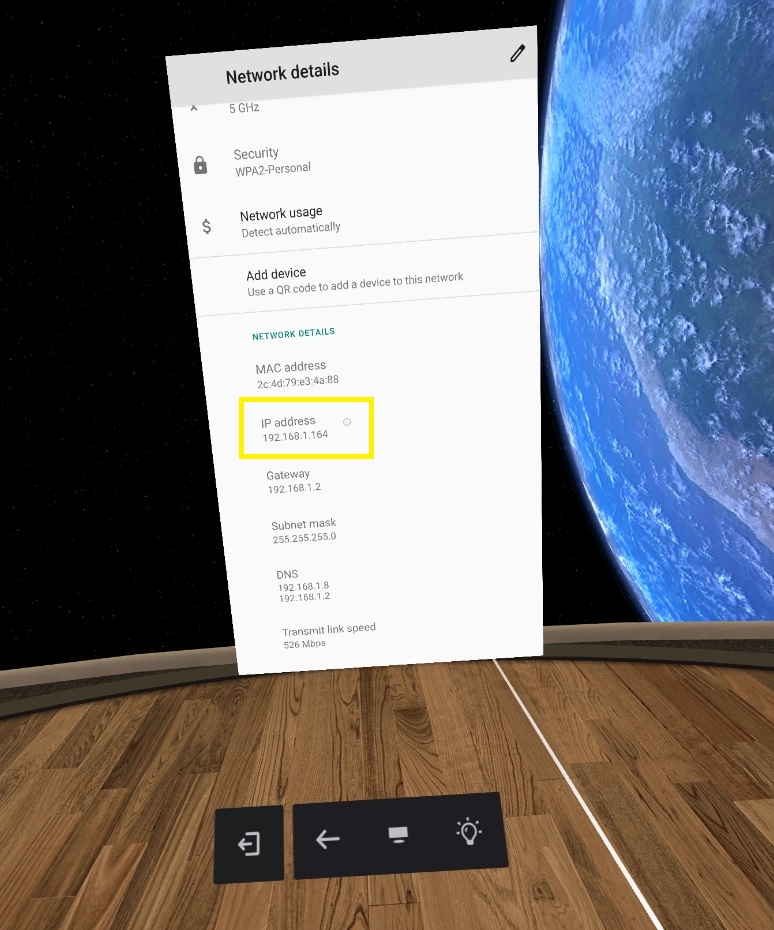
- Within this menu select ‘Advanced' to expand it.

- Scroll down and make note of the value of the ‘IP address'.
Inserting the emteqPRO Mask side inserts
| Inserting the side inserts into the emteqPRO Mask within the Pico Neo 3 Pro | Example |
|---|---|
| The Pico Neo 3 Pro Eye will arrive pre-packaged with a set of Side Inserts preinstalled. | 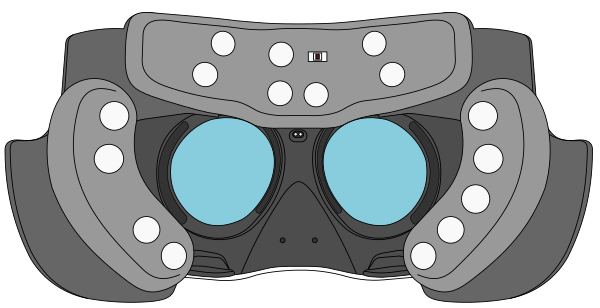 |
| These Side Inserts can be easily removed without tools by simply pulling it out straight from the mask, without any need to power off the device. | 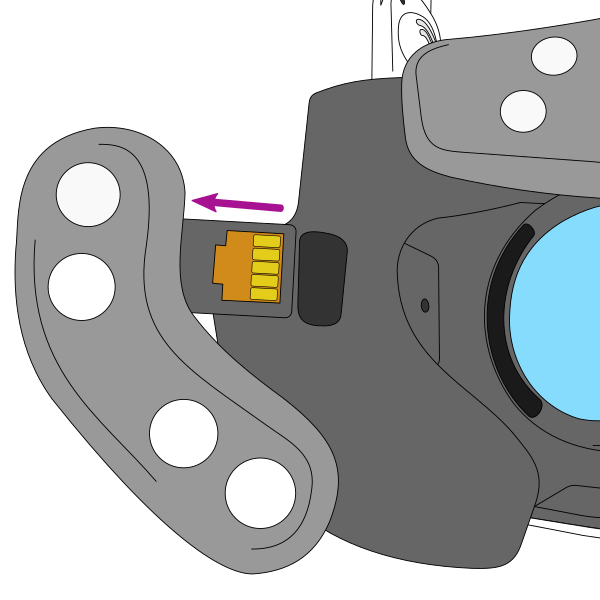 |
| The Side Inserts come in pairs with both Wide and Narrow options available and labelled, these can be mixed and matched if required. | 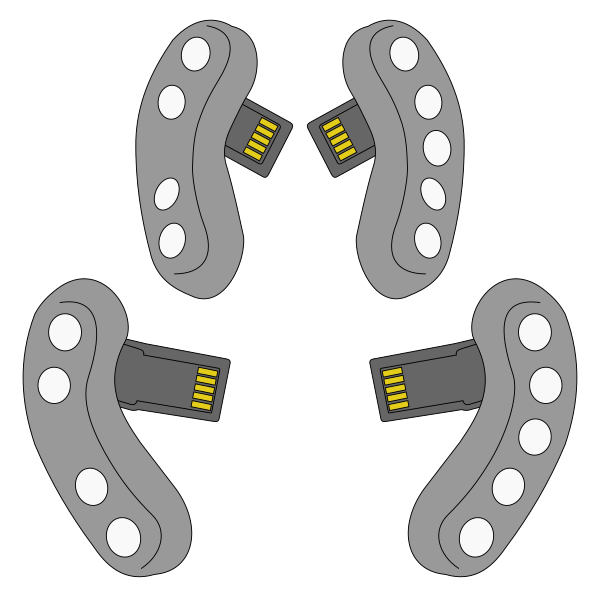 |
| With both removed you can clearly see the slots on each side of the emteqPRO Mask. | 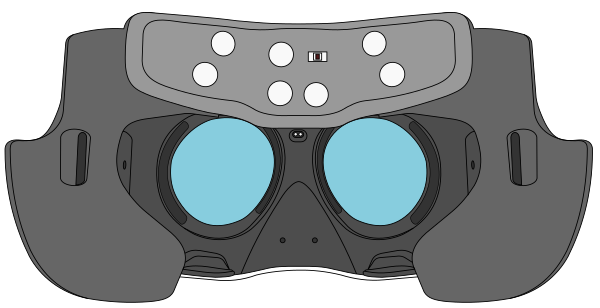 |
| Replacing the Side Inserts into the slots the same way they were removed. | 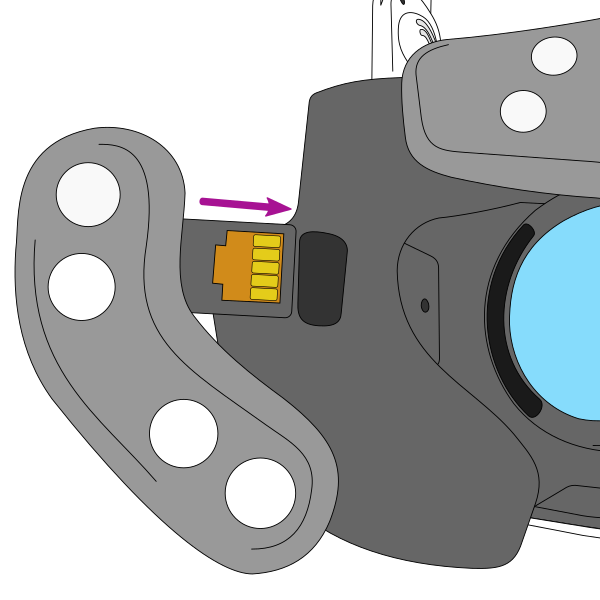 |
The emteqPRO Mask and it’s components should fit snugly into the Pico Neo 3 Pro Eye mask and not require excessive force to remove. The clips that hold it in place are fairly robust but you should exercise care when modifying anything.
Fitting the HMD with emteqPRO Mask to your face
When placing the Pico Neo 3 Pro Eye to your face with the emteqPRO Mask installed you should first lift the rear of the Neo 3 Pro up and loosen then rear mount to be wide enough to allow it to lower back down over the user's head once placed on the head.
Placing the mask around the eyes such that the sensors make contact with the brow and cheeks without obstructing the view to the eye pieces using one hand to gently hold it in place.
Finally lowering the rear strap on the HMD and twisting the fastener to tighten it around the head with your free hand. It should be tight enough to ensure a secure fit without putting too much pressure on the user's skin.
Do not place pressure on the headset into the user’s face. It should simply be held in place touching the users face before securing the HMD with the rear twisting fastener and the top elastic strap, this is the best way to ensure a good connection without damaging the HMD or emteqPRO Mask.
Installing Custom Software
Installing APK files (Manual App Installation)
The Pico Neo 3 Pro Eye allows for the installation of APK files directly in addition to the built in app store. To do this you will need either a USB-C cable to attach the Pico Neo 3 Pro Eye to a PC or a micro SD card to transfer the files. Whichever you chose the instructions are the same, only the APK file location will differ.
Assuming you have already created/downloaded the APK file you wish to install on the Pico Neo 3 Pro Eye follow these instructions:
- Attach a USB-C cable to the Pico Neo 3 Pro Eye and the PC, not the short cable attached to the emteqPRO mask.
- OSX users will also need to install Android File Transfer in order to browse storage on the Pico Neo 3 Pro Eye.
- Copy the file from the PC to a folder on the Pico Neo 3 Pro Eye internal storage, we recommend using the ‘Downloads' folder.
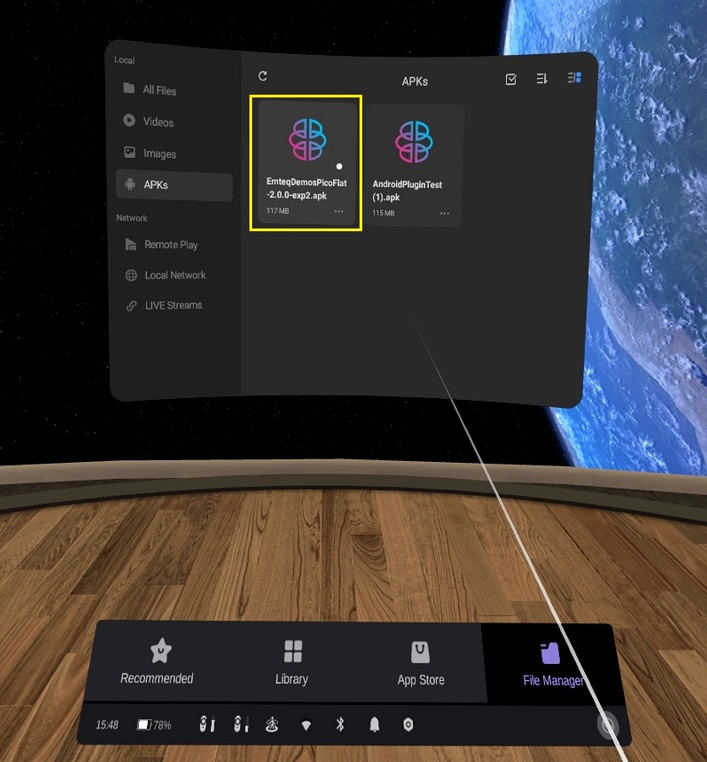
- Now from the Home screen of the Pico Neo 3 Pro Eye select ‘File Manager'.
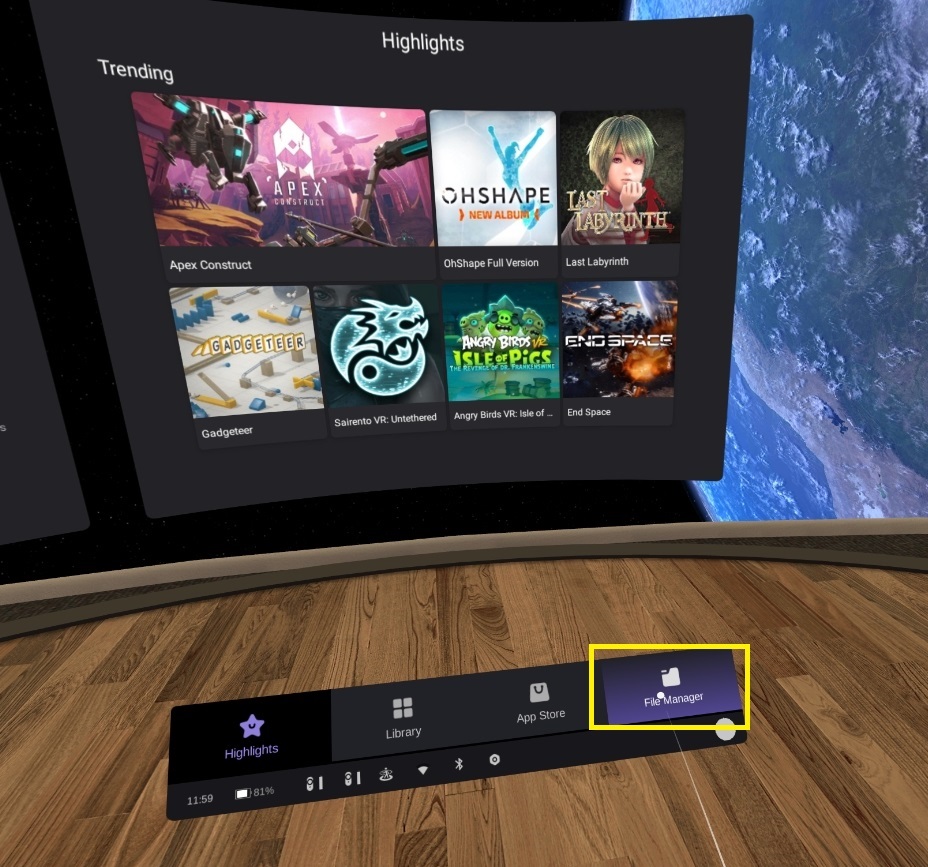
- Once open you can see some filter options including ‘APKs', select this.

- Once in APK view you should be able to easily locate the file, selecting it will run the installation wizard.
- To run the installer simply select ‘Install' in the bottom left.
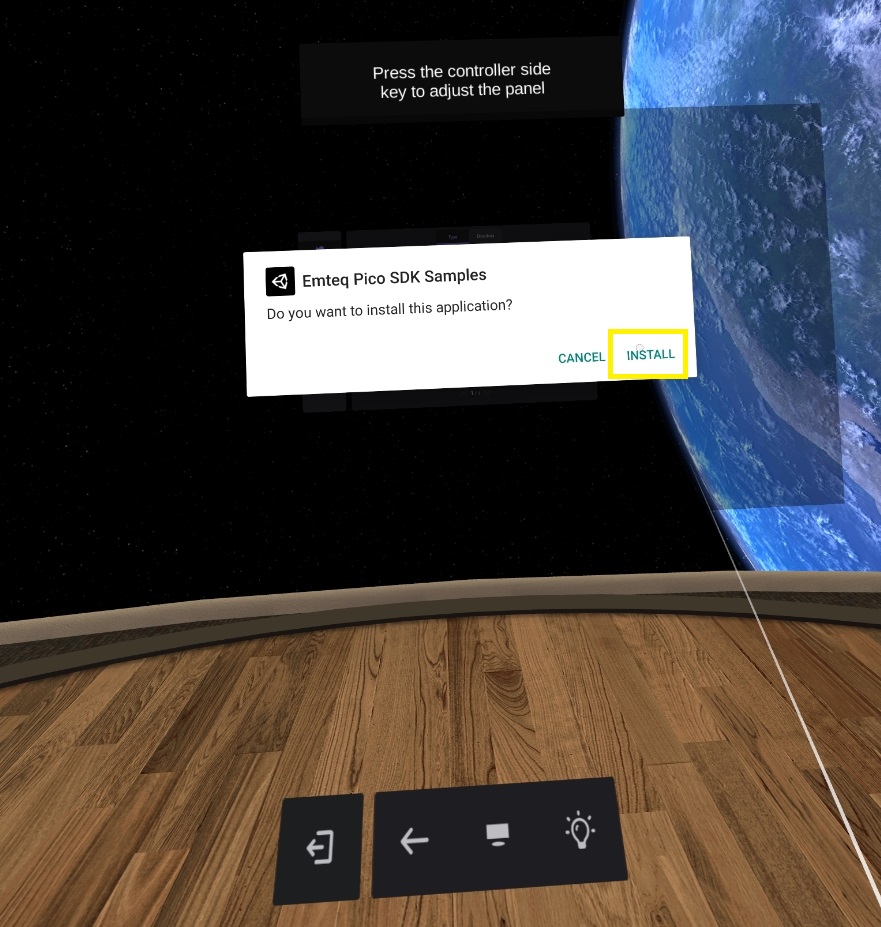
- It should only take a few seconds for the installer to complete.
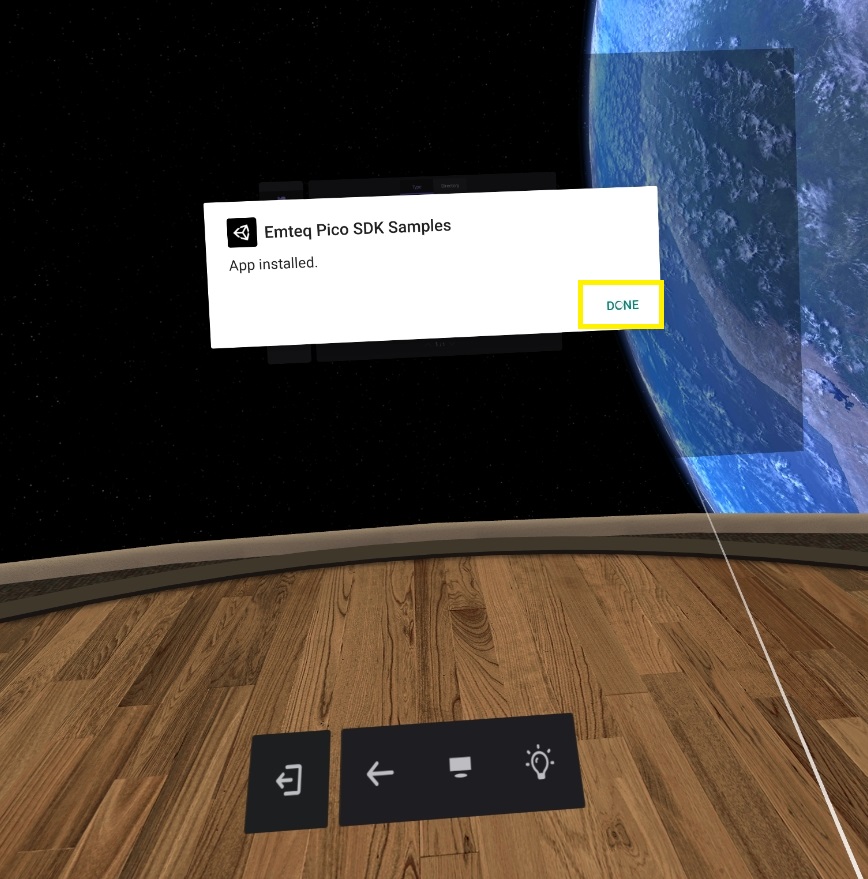
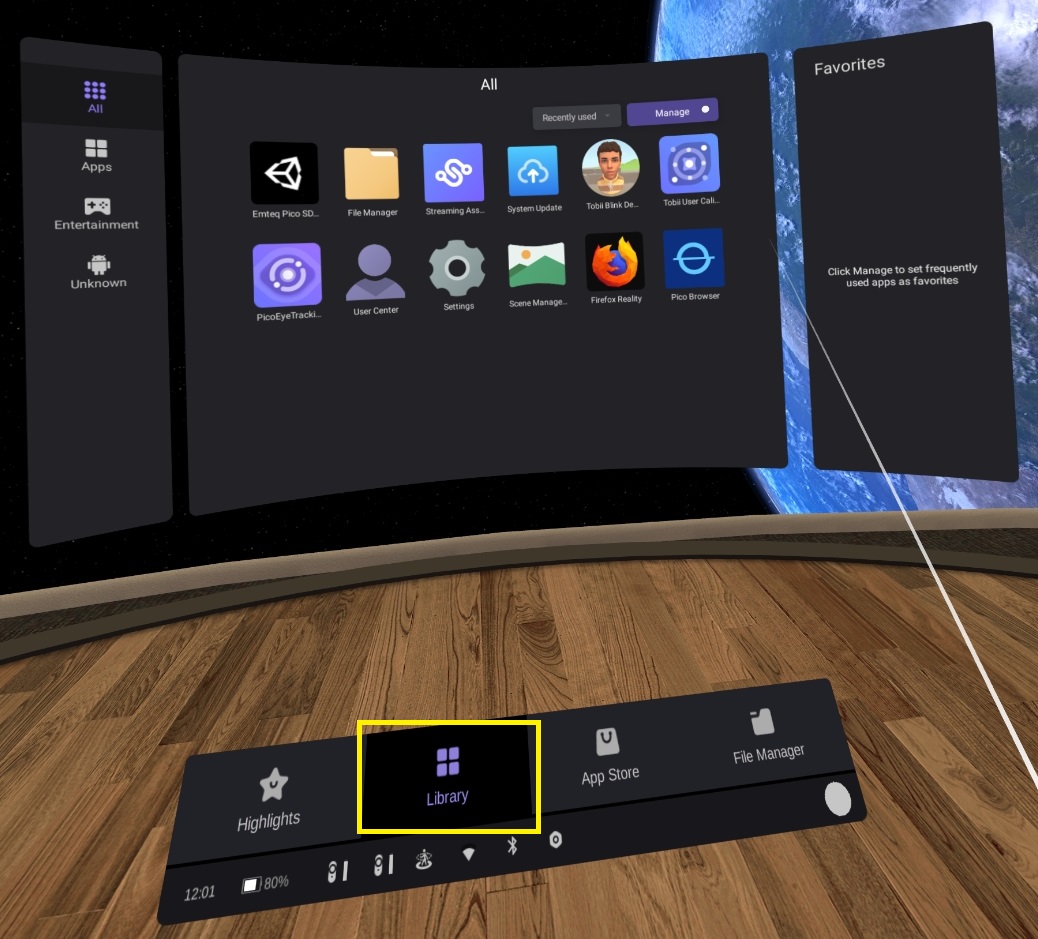
- You can now move to the Library from the menu and select the app to run it.
Ensure you backup all required data as a matter of best practice. Uninstalling the SDK app from the Pico Neo 3 Pro Eye will result in all assosiated data recording also being deleted.
Battery Consumption
Optimising Battery Life
Battery drain will vary depending on the applications being run and the activities performed during operation. However even under heavy load the Pico Neo 3 Pro Eye should last around 70 to 90 minutes of continuous use. There is the option of charging it from a separate battery worn in a backpack or placed into a pocket.
Sleep Mode
This is a useful function in that much like a smart phone when the display is inactive it saves significant battery power. This can be easily toggled by a short press of the power button.
Disconnection of the USB-C cable from the emteqPRO Mask attached to the Pico Neo 3 Pro Eye will reduce power consumption when in Sleep Mode. If you plan to leave the device idle for extended periods, several hours or more, this will significantly reduce the drain allowing for longer run times.
Warnings and precautions
Maintenance
The emteqPRO Mask that fits the Pico Neo 3 Pro Eye is not intended to be used in Open Face Mode. Only use it while fitted to the provided Pico Neo 3 Pro Eye.
Do not use the equipment for any application before confirming that it is functioning as expected. If there is any evidence that the equipment is defective or functioning incorrectly, do not use it and contact Emteq Labs immediately, as this device has no user serviceable parts inside. Do not remove any of the casings from this equipment, doing so may affect the performance of the equipment and will void your warranty and support status.
Proper training
Do not use the equipment for any application unless you have a proper and adequate training to a safe and efficient use. If you aren’t sure that you are able to use this equipment in a safe and efficient way, do not use it.
Expected use and Compatibility
Do not use the equipment for any purpose other than those for which it is intended. Do not use the equipment with other products than the ones whose compatibility has been recognised by Emteq Labs and clearly documented for use.
This equipment must be used only in compliance with the safety instructions specified in this documentation, and exclusively for intended purposes.
Time Limits
The unit is designed such that it may be operated continuously, but the expected period of continuous use is less than one hour.
Cleaning and Disposal
Cleaning
Sterilisation of VR headsets is important in preventing contamination. The use of any 70% ethanol-based disinfectant wipes are appropriate and recommended for cleaning our headsets. Clinell universal sanitising wipes (non-sporicidal) are recommended.
It is possible that the high alcohol concentration of disinfectant wipes may cause irritation in some individuals. In these cases, we recommend wiping the skin facing surfaces again with an alcohol-free non-abrasive cleaning wipe.
Avoid using water and liquids as it can cause damage to electronic components, which will affect the operation of the equipment.
Disposal
The equipment includes materials that can be potentially harmful to the environment and must be disposed of responsibly. Emteq Labs encourage the recycling of electrical components and materials and will assist in disposal of the equipment. Contact us if assistance is required.
The equipment or parts of it must not be disposed of as industrial or domestic waste, they must be collected separately as special waste. The separate collection for the subsequent forwarding for recycling, treatment and environmentally compatible disposal, helps to avoid possible negative environmental and health effects and to promote recycling of the parts included in the equipment. Illegal disposal of the equipment will result in administrative sanctions according to the current regulations of the country where the equipment is installed.
For information on how to dismantle inoperative equipment contact us.
